Modifying Wells
Wells are imported into WellData
modules. Once the wells exist in the WellData
module, the wells can be displayed with a WellRender
module or the data can be extracted with an ExtractPoints
module. The below list a few of the features of the wells that can be
changed.
Importing Wells
To import wells in a tabular format data file:
Click
the File | Import command.
In
the Import dialog, select
the well data file and click Open.
In
the Property Manager, specify
the Output type, Sheet
type, and data columns.
If
necessary, create a WellData
module by double-clicking
Well
| WellData in
the Module
Manager.
Connect
the Data Source module to
the WellData module.
To import wells in a non-tabular format:
Click
the File | Import command.
In
the Import dialog, select
the well data file and click Open.
Specify
any file import options in the file type specific Import
Options dialog.
In the Network Manager,
you can see that a WellData module was created. Click
on the WellData module to select it. In the
Property
Manager, you
can see the wells that were imported. If you click on the  next
to any well, you can see the information that was imported for that
well.
next
to any well, you can see the information that was imported for that
well.
Importing Additional Wells
If an existing WellData module
exists and your files are in a tabular format, you can use the steps in
the Importing Wells section above
to import additional wells.
If the data file is in a non-tabular format,
such as LAS, check
the Add to existing WellData module
check box in the Import Options
dialog. Alternatively, click on the WellData
module. In the Property Manager,
click the Add Data button.
Hiding Wells
To hide wells, click on the WellData
module in the Network Manager.
In the Property Manager, click
on the well to be hidden. Right-click and select Hide
[well name] from the menu. The well is disabled from the WellData module and hidden in the
viewer window. To show a hidden well, right-click on the well and select
Show [well name] from the
menu.
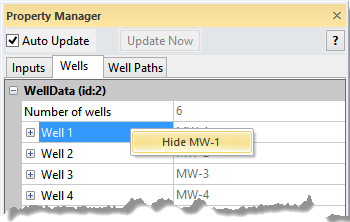
Select the Hide
MW-1 text to hide the MW-1 well in the viewer window.
Alternatively you can hide wells in the WellRender
module properties. Click on the WellRender
module. In the Property Manager,
click on the General tab. In the
Wells section, uncheck the box
next to the well you don't want to display.
Changing Wells
To change well information, update the well information in the Voxler worksheet. If
the well data is imported into a Data Source module,
click the Edit Worksheet button
in the Property Manager to update
the well data in the worksheet. Changes made to the well information are
automatically visible when you return to the Viewer
window.
If the well data was imported directly into the WellData
module, update the well information in the original data file. Next, in
Voxler, use the steps in the Importing Wells section above to
import the changed data. Voxler
will automatically change the data in the WellData
node to the new data.
Displaying Wells
To display wells, add a WellRender
module to the WellData
module. Click on the WellData
module to select it. Click the Network
| Graphics Output | WellRender command. The default display
for the wells is shown.
Setting Well Properties
Well properties are set in the WellRender
module. Click on the WellRender
module in the Network Manager
to select it. Properties are changed in the Property
Manager.
See Also
WellData
VolRender
Contours
Gridder
Connecting Modules
Introduction to Modules