Select the Viewer Window module in the
Network Manager to display the module
properties in the Property Manager.

Change the appearance of the Viewer window
by modifying the properties in the Property Manager.
The Viewer Window is a module in the Network Manager that displays information about the current properties of the Viewer window and contains various properties that affect the entire scene, such as background color. The Viewer Window is automatically created. New Viewer Windows cannot be added to an existing network. Existing Viewer Window modules cannot be deleted from an existing network. The Viewer Window is displayed in the Network Manager; it is not listed in the Module Manager since it always exists and cannot be deleted.
The Viewer Window only controls the options for the current Viewer window. To change the default Viewer window settings, click the Tools | Options command and click on the Colors tab. The New viewer window background controls the color of future Viewer windows.
Input: none - A single Viewer Window is automatically created and always present
Output: Info
To change the default Viewer window properties that will remain for future Voxler instances, click the Tools | Options command to open the Options dialog. The Colors page contains options to customize the Network manager background, New viewer window background, Viewer wireframe color, Viewer axis triad X, Viewer axis triad Y, Viewer axis triad Z, and Viewer axis triad text. Select one of the options and then select a new color from the color drop-down list.
Select a module in the Network Manager to display the module properties in the Property Manager. The property options are discussed below.
Select the Viewer Window module in the
Network Manager to display the module
properties in the Property Manager.
Change the appearance of the Viewer window
by modifying the properties in the Property Manager.
The Vertical exaggeration option sets the scale for the Z direction for the entire project. The Vertical exaggeration sets the ratio of the X and Y scale over the Z scale. For the vertical exaggeration to be calculated and reported correctly, the X, Y, and Z units should all be the same units. For instance, all of the values should be in feet or all of the values should be in meters.
The Vertical exaggeration can range between 0.00001 and 100000. A Vertical exaggeration of 1 is considered no vertical exaggeration. This means that the distance covered by one page unit vertically is the same as the distance covered by the same page unit horizontally. When set to 10, the distance covered by one page unit vertically is ten times as large as the distance covered by the same page unit horizontally. To change the Vertical exaggeration, highlight the existing value and type the desired value or click the  button to increase or decrease the value. Press ENTER on the keyboard to make the change.
The background color is the color of the Viewer window where no objects are shown. The background color can make a difference in how objects appear in the Viewer window. The background color can also be exported or copied. To change the color of the Viewer window background, click the color next to Background color. The color palette opens. Choose an existing color, or click the Other button to open the Colors dialog. The Colors dialog allows you to select additional colors or create a new color.
Ambient lighting is light that comes from all directions, without a single source. Ambient light has been scattered so evenly that its direction is impossible to determine. Ambient light does not cast shadows. All items in the Viewer window are equally lit by ambient lighting. To highlight a portion of the Viewer window, a Light module can be added to the Network Manager.
The Ambient intensity affects the brightness of the overall scene. Adjust the Ambient intensity by highlighting the existing value and typing a new value. Or, click and drag the  to a new value. The Ambient intensity value ranges between 0.0 and 1.0. A value of zero represents no light. A value of 1 represents the maximum amount of light. The larger the Ambient intensity value, the brighter the objects appear in the Viewer window.
The Ambient color changes the color of the ambient light. The light color is added to the color of the objects in the Viewer window. Click the current color next to Ambient color to change the ambient light in the scene. The color palette opens. Choose an existing predefined color or click the Other button to open the Colors dialog. The Colors dialog allows you to select additional colors or create a new color.
Fog increases opacity as distance from the camera increases. Fog is applied to the entire scene, similar to ambient lighting. Change the Fog style to None, Haze, Fog, or Smoke, depending on how you want the fog applied to the Viewer window. See the chart below for fog style descriptions and visual examples. To change the Fog style, click on the existing option and select the desired option from the list.
The fog color is the color of the fog being added to the scene. For a more realistic affect, set the Fog color to be the same as the Background color. Click the color next to Fog color to change the fog color. The color palette opens. Choose an existing predefined color or click the Other button to open the Colors dialog. The Colors dialog allows you to select additional colors or create a new color.
|
Fog Style |
Fog Style Description |
Visual Example |
Visual Example |
|
None |
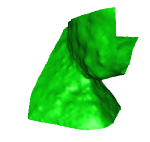
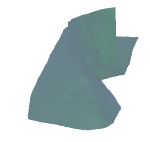
None applies no fog affect, setting the visibility of all objects equally independent of the distance from the camera. |
|
|
|
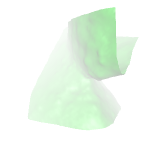
Haze |
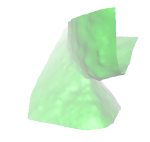
Haze sets the visibility to decrease linearly with distance from the camera. |
|
|
|
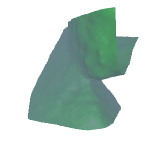
Fog |
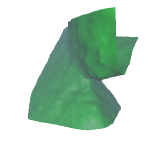
Fog sets the visibility to decrease exponentially with distance from the camera. |
|
|
|
Smoke |
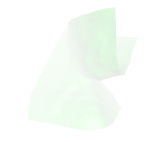
Smoke sets the visibility to decrease exponentially with the square of the distance from the camera, simulating very thick natural foggy conditions. |
|
|
See Also