 button to print the active document. The Print
dialog opens.
button to print the active document. The Print
dialog opens.Click the File | Print command
or click the  button to print the active document. The Print
dialog opens.
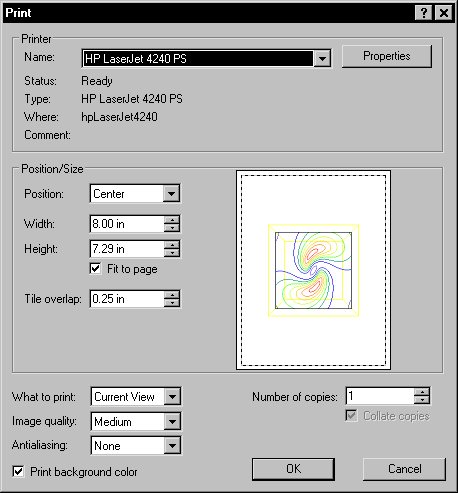
The File | Print command opens the Print dialog.

Control your printed output with precision and ease. Use the Print dialog to change
print settings and view your output before you send the print job to the
printer.
The following options are available in the Print dialog:
The Printer options specify which printer to use. The printer Status, Type, Where, and Comments are listed below the printer Name.
The default printer is listed in the Name field. If more than one printer is installed on the computer, click the down arrow to the right of the Name field to select a different printer (if needed).
The Properties button controls the printer settings. A Properties dialog specific to your printer opens. For information on specific printer settings, see the owner's manual for the printer.
Position specifies where on the page the image should be printed (Upper Left or Center). Adjust the Width or Height of the printed image, if desired.
Check the Fit to page box to scale the image to fit within the specified margins. Margins are set and displayed with the File | Page Setup command.
Enter a value next to Tile overlap to control the overlap between tiled pages that comprise oversized documents.
The What to print options control how the document pages are printed. Current View prints the portion of the scene that is visible in the current Viewer window. All prints the entire scene, including parts that might not be visible in the current Viewer window.
Image Quality
Given that DPI is the printer's resolution in dots per inch, choose Low ( DPI/8), Medium ( DPI/4), or High ( DPI/2) image quality. Low quality uses less memory (both on the computer and within the printer) and prints faster at the expense of image quality. High quality uses a high internal resolution to obtain excellent output results but requires more memory and time.
Adjust the degree of antialiasing of the printed image. Antialiasing reduces jagged lines by surrounding the lines with intermediate shades of gray or color, depending on the printer type, and is useful when a printer's resolution is too low to create smooth lines and images. Choosing 16-Pass results in the smoothest image; choosing None results in no antialiasing.
Check the box next to the Print background color option to include the window background color when printing. If this option is not selected, the printed background defaults to white.
Specify the number of copies to print. If two or more copies of multiple page documents are printed, check the Collate copies box to separate the copies into collated packets.
Click OK to start printing the document. Click Cancel to return to the Voxler window without printing the document.
See Also