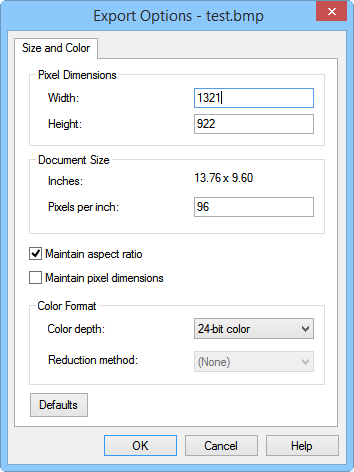
The Size and Color page of the Export Options
dialog controls options for image export.
The Export Options dialog allows you to specify options to determine how the image is exported.
Size and Color Page
This dialog appears when the File | Export command is chosen and an image format is selected as the output file type.

The Size and Color page of the
Export Options
dialog controls options for image export.
You may specify the output bitmap size in pixels (by modifying the Width and Height controls). You may also specify a resolution in dots per inch (by modifying the Pixels per inch control) and let the application calculate the output bitmap size for you. Higher resolution will yield a better-looking image, but at the expense of requiring more memory and disk space to hold the bitmap.
Image Size In Pixels
Choose the default Width and Height pixel settings for the output bitmap. Values are in pixels. The larger the values, the larger the output image.
Pixels Per Inch
Choose the Pixels per inch to change the number of pixels in the output image. The Width and Height of the Pixel Dimensions changes accordingly.
The .GIF file format is set to 72 Pixels per inch for all .GIF images and cannot be changed. GIF images are always 72 DPI by definition. For higher quality images, it is suggested that PNG, TIFF, or BMP is used instead of GIF.
Image Size
The Document Size section contains a Inches option that displays the current selected image size in inches. The image size is updated when the Pixel Dimensions or the Pixles per inch values are adjusted.
Maintain Aspect Ratio
Check the Maintain aspect ratio box if you want the image to maintain an equal horizontal and vertical resolution. When this option is checked, the output image maintains an aspect ratio of 1:1 in the output image. Higher resolution yields a better-looking image, but keep in mind that more memory and disk space are required to hold a high-resolution image.
Maintain Pixel Dimenions
Check the Maintain pixel dimensions box if you want the image to export at the selected Width and Height, but with a different number of Pixels per inch. This results in the same number of pixels, but a different Document Size.
Color Format
The Color Format gives you the option to output your image with Color depth. The greater the color depth, the more faithfully the image will represent the colors assigned to objects in your document. Different output formats support different color depths. Some output formats support 256 colors only, while others also support True Color (16 million colors).
Select one of the options from the Color Depth drop-down list. The options are: 8-bit grayscale, 16-bit grayscale, 32-bit grayscale, .1-bit color indexed, 4-bit color indexed, 8-bit color indexed, or 24-bit true color.
For example, Windows .BMP format supports monochrome, 16 colors, 256 colors and True Color. Greater color depth will yield a better-looking image, but at the expense of requiring more memory and disk space to hold the image.
Reduction Method
If you select a color indexed Color depth, you can choose a Reduction Method. Select one of the options from the Reduction Method drop-down list. The options are: Ordered Dither, Diffuse Dither, Popularity, MedianCut555, or MedianCut888.
If you select a color indexed Color depth, you can choose a Reduction method. Select one of the options from the Reduction method drop-down list. The options are: Ordered Dither, Diffuse Dither, Popularity, MedianCut555, or MedianCut888.
Dithering determines how similar colors are distributed among clusters of pixels in the reduced image. Ordered dithering uses a repeating pattern. Diffuse dithering uses a pseudo-random pattern.
Quantization determines how the colors for the exported image are selected from the palette of 16 million possible colors. Popularity uses the most frequently occurring colors in the image, and MedianCut selects colors based on the 'median cut' method that tries to select the most even distribution of colors over the range of colors that appear in the image. The Median method can use either 5 or 8 bits of sample data for each of the three color planes in the image. Larger sample sizes require more memory to perform the conversion for export, so the smallest sample size that produces an acceptable image is recommended.
Defaults
Click the Defaults button to return the export options to the default selections.
OK
Click the OK button to save your changes and export the file.
Cancel
Click the Cancel button to exit the dialog without saving your changes or exporting the file.
See Also