LAS files are files in the Log ASCII Standard format that contain log data for wells. In addition to the log data, .LAS files contain information about the header and parameter information about each of the logs contained in the .LAS. The .LAS import filter reads the log data and automatically loads it into a WellData module.
LAS Import Options Dialog
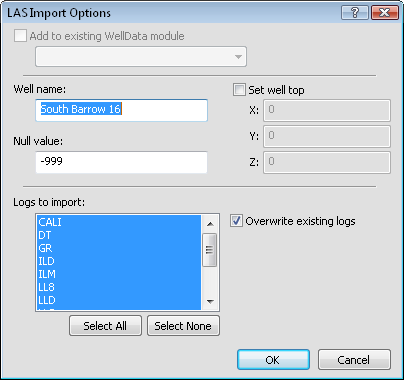
Choose the File | Import command to load a .LAS file. The LAS Import Options dialog allows you to specify options which determine how information in the file is imported.
Customize import options in the LAS Import Options dialog.
Check the box next to Add to existing WellData module if the well information in the data file should be imported into an existing WellData module in the Network Manager. Importing into an existing WellData module keeps all of the well data information in a single module in the Network Manager. This makes it easier to extract data points from the wells and grid the data. It also makes it easier to apply the same well properties in a WellRender module. After selecting Add to existing WellData module, click on the existing WellData module name and click on the desired well module to change it. Multiple well nodes can be added to the same network to display different properties for different wells.
If the box is unchecked, a new WellData module will be created.
The Well name option contains the name of the well being imported. To change the well name, highlight the existing text and type the name of the well that is being imported. By default, the file name is used for the well name. The well name is displayed in the Property Manager when a well node is selected.
The Null value is the value that is used when data does not exist in a log column. Null values are not plotted in the WellRender graphic module. To change the value, highlight the existing value and type the desired value.
Check the box next to Set well top to type in collar values for the well being imported. The X, Y, and Z options contain the coordinates of the top of the well in X, Y, and Z coordinates. To change the coordinate, highlight the existing value and type a new number. If no X, Y, or Z values are set for the well columns and the Set well top option is unchecked, the top is set to Invalid.
The Logs to import section contains a list of all logs in the .LAS file. Click on a log name to select or deselect it. Only selected logs are imported. Selected logs appear highlighted in blue in the list.
To select multiple logs, click on the first log, hold down the SHIFT key on the keyboard, and click on the last log. All logs between the first and last log are selected. To select non-continuous multiple logs, click on one log, hold down the CTRL key on the keyboard, and click on each additional log. Only the selected logs are imported.
Click the Select All button to select all of the logs in the Logs to import box.
Click the Select None button to deselect all of the logs in the Logs to import box.
Check the box next to Overwrite existing logs to replace the data in the existing WellData module for the Well name. All data in the selected logs overwrites information that was previously imported with the same log name.
Click the OK button to import the file and close the dialog. Click the Cancel button to close the dialog without importing the file.
See Also