 button
to record the current Viewer
window. Adjust the window to the desired size before choosing the
Actions | Capture Video command.
button
to record the current Viewer
window. Adjust the window to the desired size before choosing the
Actions | Capture Video command.Click the Actions | Capture Video
command or click the  button
to record the current Viewer
window. Adjust the window to the desired size before choosing the
Actions | Capture Video command.
The video capture uses the size of the current Viewer window. The size of the window will affect the file size of the final .AVI file. The window screen size is displayed in the status bar and shows the size of the window screen in pixel width by pixel height.

The status bar displays the window size. This example
shows the window as 710 pixels wide by 572 pixels tall.
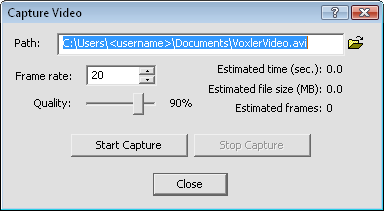
Choose the Actions | Capture Video command to open the Capture Video dialog.

Specify video capture settings in the Capture
Video dialog.
The path specifies the location where you
want to save the captured video. Click the  to open
the Choose Video Path dialog to
select a file location. Alternatively, enter a file name directly in the
Path box. The default path is
the Project folder path, and
it is set in either the Welcome to Voxler
dialog or the Tools | Options
General page.
Frame rate is the frames
per second used for the captured video. A frames per second value
of 15-20 provides good results. A low frame rate will not be able to give
the illusion of motion effectively and may produce a choppy animation.
A high frame rate may produce an unnecessarily large file size without
noticeable improvement in animation. Frame rates above 20 frames per second
will produce a large file size, but retain better image motion. To change
the value, highlight the existing value and type a new value. Alternatively,
click the  to increase or decrease the value.
Use the Quality slider to adjust the quality of the video between 50 and 100%. A value of 100% is the highest quality. A value of 50% is the lowest quality allowed. Using a lower quality (i.e. 50%) creates a smaller file size and decreased animation quality. Using a higher quality (i.e. 100%) creates a larger file size with increased animation quality. A value of 80% or above is a reasonable selection. The default value is 90%. To change the value, click and drag the slider to the desired value.
Click the Start Capture button to begin the video capture. Any dialogs over the Viewer window will be captured in the video. During video capture, dialog size and location can be adjusted. All property and view changes to the Viewer window will be captured. If visible, the world axis triad and legend are captured. The cursor is not captured. The Estimated time (sec), Estimated file size (MB), and Estimated frames information is dynamically displayed during capture.
Click the Stop Capture button to end the video capture. The Estimated time (sec), Estimated file size (MB), and Estimated frames information is statically displayed when the video has successfully completed. The video is located in the Path location.
Click the Close button to close the dialog.
See Also