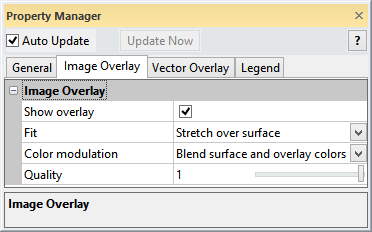
The HeightField module Image Overlay page displays options for overlaying an image onto a HeightField. To open the Image Overlay page, click on the HeightField module in the Network Manager. In the Property Manager, click on the Image Overlay tab.

The Image Overlay options allow images to be stretched
or clipped to a HeightField.
The Overlay options are available when an image is connected as an Input Image Overlay. The image file name is shown in the Input overlay on the General page.
Check the box next to the Show overlay command to show or hide the overlay display on the HeightField.
The Fit option controls how the overlay is placed on the HeightField. Available options are Stretch over surface and Clip to surface. To change how the overlay fits on the HeightField, click on the existing option and select the desired option from the list. Stretch over surface ignores the X, Y, and Z coordinates for the image and extends the image to the extents of the HeightField. Clip to surface uses the X, Y, and Z coordinates from the image and overlays the image onto the HeightField at the correct coordinates. If the image extends beyond the HeightField, the image is clipped at the extents of the HeightField.
The Color modulation option refers to the method used to combine the HeightField colormap with the image colors. Available options are Blend surface and overlay colors and Use overlay color only. To change how the overlay and HeightField are combined, click on the existing option and select the desired option from the list. When Blend surface and overlay colors is selected, the HeightField colormap and the image color are combined to create a new color that is a mix of both. When Use overlay color only is selected, the HeightField colormap does not appear. The color is defined by only the image overlay.
The Quality option determines
how detailed the image appears as the overlay on the HeightField.
Values range from zero to one. When set to zero, the image does not appear.
As the value gets larger, the image quality increases with 1 being the
best quality. As the value increases, the redraw time slows. With large
images, reducing the Quality
will result in faster redraw, though a less accurate image on the HeightField
will appear. To change the Quality,
highlight the existing value and type a new value or click and drag the
 to increase or decrease the
quality.
See Also