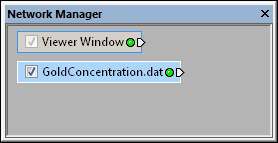
Select a data set in the Network Manager
to display its properties in the Property Manager.
Data Source modules are created when an ASCII data file, Excel data file, database file, or other type of tabular data file is loaded into the Network Manager using the File | Import command.
Defined from the point coordinates located in the data file.
Depending on the type of data imported, the Data Source module may be connected to the Graphics Output Modules, Computational Modules, or WellData Module. An Info Module may also be connected to the output node.
Click on the Data Source module in the Network Manager to select it. The Property Manager displays various data column specification properties for the data source module. The data source module properties are described below.
Select a data set in the Network
Manager
to display its properties in the Property
Manager.
The Data Source module contains the following tabs in the Property Manager:
General
The General page properties change depending on the Output type selection. The three sections below explain the shared properties, Points properties, and Wells properties respectively.
The following options are presented in the General page regardless of the Output type selection.
The properties visible above are displayed regardless of
the Output type selection.
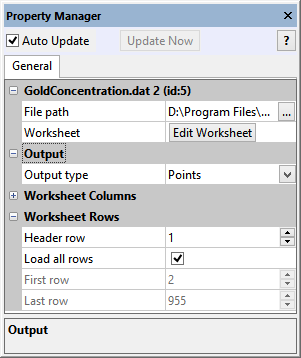
The path of the loaded source file appears next to File
path. Click the  button
to the right of the file path to display the Open
dialog. The Open dialog appears.
The currently loaded file name is display in the File
name section. The path for the current file is shown. Click the
Open button to reload the current
file.
button
to the right of the file path to display the Open
dialog. The Open dialog appears.
The currently loaded file name is display in the File
name section. The path for the current file is shown. Click the
Open button to reload the current
file.
Alternatively browse and select a new file. Click the Open button to load the new file. The dialog closes and the selected file is loaded. If the new file does not display geometry information, a warning message will appear and the original file remains.
Click the Edit Worksheet button to display and edit the data in a linked worksheet window. The title bar and worksheet tab will display "Linked to:" followed by the module name and ID. Changes made to the module data will be automatically saved and represented instantly in the viewer window.
Notice that the data linked to the module is being edited. The original data file, i.e. the file that was imported, is not changed. The data is saved in the Voxler project .VOXB file. If you wish to save the changes to a separate file (or to overwrite the original data file), use the File | Save Copy As command while viewing the linked worksheet.
The Output type option specifies whether the Data Source module contains Points or Wells information.
The Worksheet Rows section contains options for specifying which rows are used.
Specify the row containing the column titles (i.e. the header row) in
the Header row field. If the
Header row is incorrectly specified,
the column title will not be displayed next to the column letter in the
other General page property fields
or in the Property Manager
for downstream modules. Type the row number into the Header
row field, or click the  buttons to change the value. The header row value can be any integer between
1 and 1000.
buttons to change the value. The header row value can be any integer between
1 and 1000.
Check the Load all rows check
box to use all rows in the worksheet, excluding the header row if applicable.
Uncheck the Load all rows check
box to set the first and last row used in the data file. Set
the First row and Last
row properties by typing a value into the field or clicking the
buttons.
The following options are displayed when the Output type is set to Points.
Specify which information is located in the worksheet
on the General page.
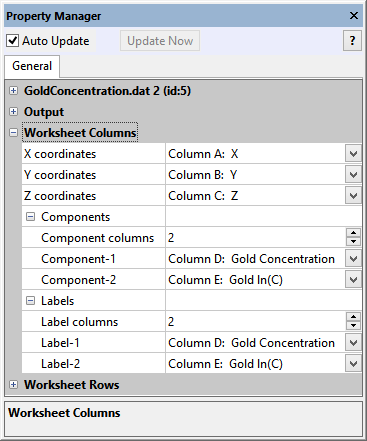
The Worksheet Columns section of the General page contains options for specifying where information is located in the worksheet. The Worksheet Columns section is displayed when the Output type selection is Points.
Voxler assigns the data columns automatically upon import. For Points data the X coordinates are assigned to the first column, Y coordinates are assigned to the second column, Z coordinates are assigned to the third column, and the remaining columns are assigned as component columns from left to right. It is unnecessary to reformat your data files in this order, as the coordinate and component columns can be manually specified in the Property Manager.
Select the column containing the X, Y, and Z coordinates in the X coordinates, Y coordinates, and Z coordinates fields respectively. Clicking the current selection in each of the fields opens a list of columns which contain data. If the data file contains a header row, the header for the column will be displayed after the column letter. For example with the GoldConcentration.dat sample file, Column A: X is one of the columns displayed in the list.
The Components section contains options for specifying the number of components and in which column(s) the component data is located.
Specify the number of component columns by typing a value or clicking
the buttons in the Component
columns field. The Component
columns value is limited by the number of columns in the data file.
Select the appropriate column for each component in the Component-1, Component-2, etc. fields. If the data file contains a header row, the header for the column will be displayed after the column letter. For example with the GoldConcentration.dat sample file, Column D: Gold Concentration is one of the columns displayed in the list. The header information is also passed to downstream modules, which makes selecting the desired component or coordinate column easier.
The Labels section contains options for specifying the number of label columns and which columns will be used for labels.
Specify the number of label columns by typing a value or clicking the
buttons in the Label
columns field. The Label
columns value is limited by the number of columns in the data file.
Select the appropriate column for each component in the Label-1, Label-2, etc. fields. If the data file contains a header row, the header for the column will be displayed after the column letter. The header information is also passed to downstream modules, which makes selecting the desired label column easier.
The following options are displayed when the Output type is set to Wells.
Specify which well information is included in the worksheet
on the General page.
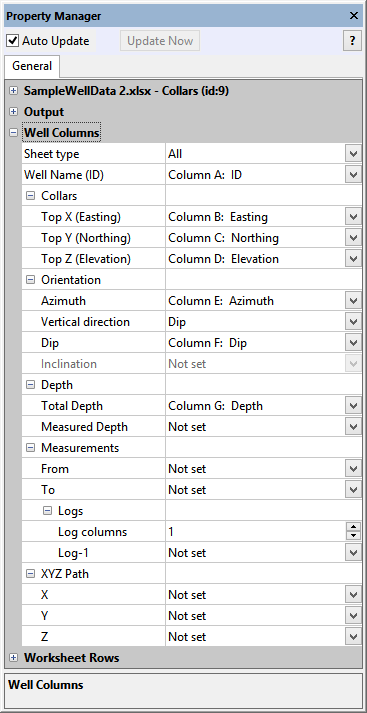
The Well Columns section of the General page contains options for specifying where information is located in the worksheet. The Well Columns section is displayed when the Output type selection is Wells.
Voxler assigns the data columns automatically upon import. For Wells data the Sheet type property affects the automatic assignment. The automatic assignments are made in the column order, from left to right, specified by the table below. It is unnecessary to reformat your data files to match the following order, as the well data columns can be manually specified in the Property Manager.
Order |
Collars |
Directional Survey |
From/To Logs |
Logs/Curves |
XYZ Path |
1 |
Well Name (ID) |
Well Name (ID) |
Well Name (ID) |
Well Name (ID) |
Well Name (ID) |
2 |
Top X (Easting) |
Measured Depth |
From |
Measured Depth |
Measured Depth |
3 |
Top Y (Northing) |
Azimuth |
To |
Log-1 |
X |
4 |
Top Z (Elevation) |
Inclination/Dip |
Log-1 |
Log-2 |
Y |
5 |
Azimuth |
|
Log-2 |
|
Z |
6 |
Dip/Inclination |
|
|
|
|
7 |
Total Depth |
|
|
|
|
The Sheet type property simplifies the General page display by showing only the options pertaining to the selection. Select Collars, Directional Survey, From/To Logs, Logs/Curves, or XYZ Path from the Sheet type list if one of the options is appropriate for the data file. Select All in the Sheet type list to view all of the properties in the General page. The following table shows which properties are found under each Sheet type selection.
Sheet Type |
Well Columns and Properties Displayed |
Collars |
Well Name (ID), Top X (Easting), Top Y (Northing), Top Z (Elevation), Azimuth, Vertical direction, Dip, Inclination, Total Depth |
Directional Survey |
Well Name (ID), Azimuth, Vertical direciton, Dip, Inclination, Measured Depth |
From/To Logs |
Well Name (ID), From, To, Log columns, Log-# |
Logs/Curves |
Well Name (ID), Measured Depth, Log columns, Log-# |
XYZ Path |
Well Name (ID), Measured Depth, Log columns, Log-#, X, Y, Z |
The column that contains the name assigned to a well. The well name is also referred to as Well ID or Borehole Name. The well name is a unique name assigned to each well. This name is used to connect data from multiple imports to the same well.
If the column containing the Well Name (ID) contains blanks, that well is not imported.
The Collars section contains the Top X (Easting), Top Y (Northing), and Top Z (Elevation) column options.
The Top X (Easting) column is the column that contains the physical X (easting) location of the collar.
The Top Y (Northing) column is the column that contains the physical Y (northing) location of the collar.
The Top Z (Elevation) column is the column that contains the physical Z (elevation) location of the collar.
The Orientation section contains the Azimuth, Dip, and Inclination column options and the Vertical direction property.
The Azimuth column is the column that indicates the angle of the well bore direction, as projected on a horizontal plane and relative to true north. Values are in degrees. By industry convention, zero is north, and the angle increases clockwise.
The Vertical direction property specifies whether the data file uses a Dip column or Inclination column.
The Dip column is the column that indicates the deviation from horizontal of the well path. This value is in degrees and is between +90 and -90. +90 is completely vertical and pointing up. Zero is completely horizontal. -90 is completely vertical and pointing down. This is used in conjunction with Azimuth.
The Inclination column the column that indicates the vertical angle of the well bore direction. Values are in degrees. By industry standard, zero degrees is vertical (directly down) and 90 degrees is horizontal. An inclination greater than 90 degrees would indicate drilling upward.
The Depth section contains the Total Depth and Measured Depth column options.
The Total Depth column is the column that contains the true ending depth of the well.
The Measured Depth column is the column that contains the true measured depth along the log.
The Measurements section contains the From, To, and Log-# column options and the Log columns property.
The From column is the column that contains the starting depth of an interval measurement for a log. This is used in connection with the To column when importing interval type well logs.
The To column is the the column that contains the ending depth of an interval measurement for a log. This is used in connection with the From column when importing interval type well logs.
The Log
columns property specifies the number of log columns in the
data file. Type the number of log columns into the Log
columns field or click the buttons to adjust
the Log columns value. The
Log columns value is limited
by the number of columns in the data file.
A Log-1, Log-2, etc. column is any column that contains values to be displayed on the well. These could be porosity, permeability, gamma, resistivity, or any other measured value along the depth of the log. Normally, these values are used to display along the log. When converted to data points, these Log values can be gridded and displayed as an Isosurface, VolRender, or FaceRender. If the data file contains a header row, the header for the column will be displayed after the column letter. The header information is also passed to downstream modules, which makes selecting the desired label column easier.
The XYZ Path section contains the X, Y, and Z column options.
The X column is the column that contains the X (easting) location of each point being imported along the well trace.
The Y column is the column that contains the Y (northing) location of each point being imported along the well trace.
The Z column is the column that contains the Z (elevation) location of each point being imported along the well trace.
See Also